
[document]
[index]1. Setup[/index]
 [index]2. Connection[/index]
You can download the software here.
Next, open the Delta X software:
 [index] 2.1. Cable connection[/index]
- Setup:

- Step 1: Check the Auto check box
- Step 2: Click the Connect button
If “Connect” word change to “Disconnect” word, the connection is successful


b. Manual connection:
- Step 1: Uncheck the Auto check box
- Step 2: Click the Connect button

Connection dialog box appears:

- Choose COM type and click the OK button

- Choose the COM port name of your robot and click the OK button

- Input the Baudrate value is 115200 and click the OK button

When “Connect” word change to “Disconnect” word that mean the connection is successful.
[index] 2.2. Bluetooth connection[/index]
- First, select Bluetooth mode:

- Turn on Bluetooth on your computer, then connect to Delta X 2 robot with the password is ‘1234’.
- On the software, we check the Auto check box and click the Connect button:

If “Connect” word change to “Disconnect” word, the connection is successful.
 [index] 2.3. Wifi connection[/index]
- First, select Wifi mode:

- On the software, we uncheck the Auto check box and click the Connect button.
- Choose Wifi type and click the OK button:

- Input the robot’s IP address and Port is 8844. Then click the OK button.

(See the section 2.2.e. Setup wifi connection in this document to get the IP address of your robot)
When “Connect” word change to “Disconnect” word that mean the connection is successful.
[index] 2.4. Moving testing area[/index]

After successful connection, the first thing to do is make the arm go home.
To do that, we click the Home button.

After robot go home successfully, here is end-effector’s home position:

And here is the working area:

To move end-effector to everywhere in Working area, we must to move Z so that Z ≤ −275 mm.
Now, we move to Z = −280 mm. Input the ‘-280’ value into here:

Press Enter or click Z button then robot’s arm will go down.
And now, you can click everywhere in Working area, the arm will move to there. And the position of the arm will be update at Movement panel.
You can also move the arm to the target position by input the positions into corresponding text-boxes. For example:

After press Enter key, the arm of robot will move to X = 100, Y = -100, Z = -280mm
There is another way to control manually the robot arm. You can use these buttons:

But, before control, we set Division value from 1 mm because 0.5 value hasn’t been updated yet. We will update it in future versions of the software.

You can use keyboard to control the arm by press Shift + A, D, W, S, R, F
To adjust acceleration and velocity of motion, we can input the value into Velocity and Accel text box. Then press the Enter key.
 [index] 2.5. End effector testing area[/index]
And here is End-effector testing area:

When you input an angle value from 0 to 180 degrees and press Enter, the 4 axes will rotate a corresponding angle.

To turn on/off the Laser and Vacuum, click on the corresponding buttons in the Relay panel.
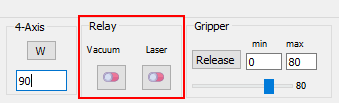
To test the grippers, we drag and drop the value bar below to determine the correct opening and closing position of grippers. Then input the corresponding values in the min or max textboxes

+ min: gripper opening angle
+ max: gripper closing angle
After choosing the right opening and closing angles, we should note these values for future programing of gripper applications.
[index] 2.6. Programing area[/index]
Here is the Programing area:

To get started with G-code programing, click the New button to create a new file and name it.


Then, click the Save button.

And now everything is ready for programming.
To add a G-code command, you can choose here:

And enter the values into the correspond textboxes

For example, we enter X100, Y-100, Z-280 and then click Add button or press Ctrl + D keystrokes.


Immediately there will be a line of G-code added in the Editor:

You can also type G-code commands directly into the Editor.
After the programing is done, to make the program become more visual and easy to read, click the Format button to reformat the program.

Here is the program after formatting:

Next, click the Execute G-code button to run the program:

Finally, save your program by click the Save button:
 [/document]
[index]1. Setup[/index]
You can download the software here.
Next, open the Delta X software:
- Setup:
a. Automatic connection:
- Step 1: Check the Auto check box
- Step 2: Click the Connect button
If “Connect” word change to “Disconnect” word, the connection is successful
b. Manual connection:
- Step 1: Uncheck the Auto check box
- Step 2: Click the Connect button
Connection dialog box appears:
- Choose COM type and click the OK button
- Input the Baudrate value is 115200 and click the OK button
[index] 2.2. Bluetooth connection[/index]
- First, select Bluetooth mode:
- Turn on Bluetooth on your computer, then connect to Delta X 2 robot with the password is ‘1234’.
- On the software, we check the Auto check box and click the Connect button:
If “Connect” word change to “Disconnect” word, the connection is successful.
- First, select Wifi mode:
- On the software, we uncheck the Auto check box and click the Connect button.
- Choose Wifi type and click the OK button:
(See the section 2.2.e. Setup wifi connection in this document to get the IP address of your robot)
When “Connect” word change to “Disconnect” word that mean the connection is successful.
[index] 2.4. Moving testing area[/index]
After successful connection, the first thing to do is make the arm go home.
To do that, we click the Home button.
After robot go home successfully, here is end-effector’s home position:
And here is the working area:
To move end-effector to everywhere in Working area, we must to move Z so that Z ≤ −275 mm.
Now, we move to Z = −280 mm. Input the ‘-280’ value into here:
Press Enter or click Z button then robot’s arm will go down.
And now, you can click everywhere in Working area, the arm will move to there. And the position of the arm will be update at Movement panel.
You can also move the arm to the target position by input the positions into corresponding text-boxes. For example:
There is another way to control manually the robot arm. You can use these buttons:
But, before control, we set Division value from 1 mm because 0.5 value hasn’t been updated yet. We will update it in future versions of the software.
You can use keyboard to control the arm by press Shift + A, D, W, S, R, F
To adjust acceleration and velocity of motion, we can input the value into Velocity and Accel text box. Then press the Enter key.
And here is End-effector testing area:
When you input an angle value from 0 to 180 degrees and press Enter, the 4 axes will rotate a corresponding angle.
To turn on/off the Laser and Vacuum, click on the corresponding buttons in the Relay panel.
To test the grippers, we drag and drop the value bar below to determine the correct opening and closing position of grippers. Then input the corresponding values in the min or max textboxes
+ min: gripper opening angle
+ max: gripper closing angle
After choosing the right opening and closing angles, we should note these values for future programing of gripper applications.
[index] 2.6. Programing area[/index]
Here is the Programing area:
To get started with G-code programing, click the New button to create a new file and name it.
Then, click the Save button.
And now everything is ready for programming.
To add a G-code command, you can choose here:
And enter the values into the correspond textboxes
For example, we enter X100, Y-100, Z-280 and then click Add button or press Ctrl + D keystrokes.
You can also type G-code commands directly into the Editor.
After the programing is done, to make the program become more visual and easy to read, click the Format button to reformat the program.
Here is the program after formatting:
Next, click the Execute G-code button to run the program:
Finally, save your program by click the Save button: