
[document]
To turn off the temperature, send “M104 S0”

And now, the temperature is decreasing.
[index] c. Pump Box and Suction Cup testing[/index]
Send “M360 E0” to select Vacuum mode.
“G01 W<angle>”: rotate to <angle> degree on 4-axis with <angle> from 0 to 180 degree.
“M03”: Turn on the Vacuum
“M05”: Turn off the Vacuum
[index] d. Gripper testing[/index]
Send “M360 E1” to select Gripper mode.
“G01 W<angle>”: rotate to <angle> degree on 4-axis with <angle> from 0 to 180 degree.
“M03 S<angle>”: Gripper close to <angle> degree
“M03 S0” or “M05”: Gripper open
[index] e. Setup wifi connection[/index]
Please still connect your computer with robot via USB cable to setup wifi connection.
Next, we must choose wifi mode:

Set SSID of your wifi for robot: “SSID:<YourWifiName>”
Set password of your wifi for robot: “PSWD:<YourPassword>”
For example:

If your robot responds to its IP address, setup done! Robot was able to automatically connect to your wifi every time you choose the wifi mode.
Note: You should make a note of the robot’s IP address for the wifi connection with Delta X Software.
[/document]
[index]1. Setup[/index]
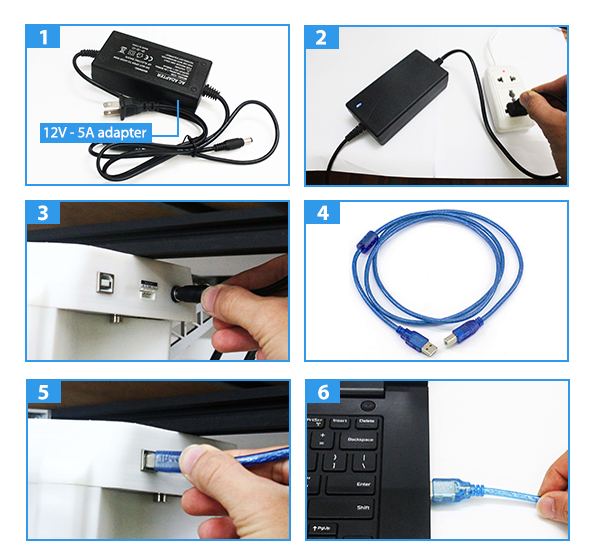
Turn on Termite 3.4 software (You can download Termite software here)
Click the Settings button and set the parameters as below:

- Port: choose the COM port of the robot. The COM port name may be different on your computer.
- Baud rate: choose the ‘115200’ value.
- Transmitted text: the end of each command send to COM port of the robot must be a newline character (‘\n’). So, we choose Append LF (‘\n’) or Append CR-LF (‘\n\r’).
Next, click the OK button.

To check the connection, send the “IsDelta’’ command 2 times. If connection is stable and the COM port belongs to Delta X, it will respond “YesDelta’’.

And now, you can send G-code commands to Delta X 2. For example, send “G28’’ to make the robot go home. When robot go home successfully, it will respond “Ok”.

[index] 2.2. Testing[/index]
Send “Position” to get current end-effector position.

And here is working area of Delta X 2:
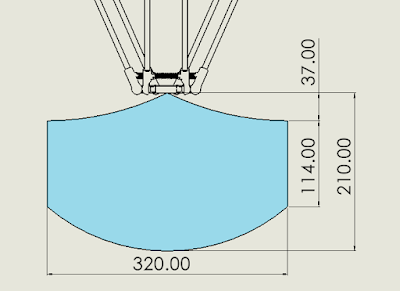
And the largest working area corresponds to −275 ≥ Z ≥ −389 mm.
So, now we send “G01 Z-280” to get the arm move down.
And now, you can move the arm to anywhere in the working area by G-code.
For example:
“G01 Z-280”: move to Z = -280 mm
“G01 X100”: move to 100mm on the X-axis
“G01 X0 Y-160”: move to X = 0mm and Y = -160 mm
…
You can refer the G-code commands here.
[index] a. Laser module testing[/index]
Before use Laser, we must select the end-effector for robot by send “M360 E<index>” with <index> =:
0: Vacuum
1: Gripper
2: Pen
3: Laser
4: 3D Printer
5: Custom
So, we send “M360 E3” to select Laser mode.
[index]2. Connect and test the robot with Termite software[/index]
[index] 2.1. Connection[/index]Turn on Termite 3.4 software (You can download Termite software here)
Click the Settings button and set the parameters as below:
- Baud rate: choose the ‘115200’ value.
- Transmitted text: the end of each command send to COM port of the robot must be a newline character (‘\n’). So, we choose Append LF (‘\n’) or Append CR-LF (‘\n\r’).
Next, click the OK button.
To check the connection, send the “IsDelta’’ command 2 times. If connection is stable and the COM port belongs to Delta X, it will respond “YesDelta’’.
And now, you can send G-code commands to Delta X 2. For example, send “G28’’ to make the robot go home. When robot go home successfully, it will respond “Ok”.
[index] 2.2. Testing[/index]
Send “Position” to get current end-effector position.
And here is working area of Delta X 2:
And the largest working area corresponds to −275 ≥ Z ≥ −389 mm.
So, now we send “G01 Z-280” to get the arm move down.
And now, you can move the arm to anywhere in the working area by G-code.
For example:
“G01 Z-280”: move to Z = -280 mm
“G01 X100”: move to 100mm on the X-axis
“G01 X0 Y-160”: move to X = 0mm and Y = -160 mm
…
You can refer the G-code commands here.
[index] a. Laser module testing[/index]
Before use Laser, we must select the end-effector for robot by send “M360 E<index>” with <index> =:
0: Vacuum
1: Gripper
2: Pen
3: Laser
4: 3D Printer
5: Custom
So, we send “M360 E3” to select Laser mode.
To on the Laser, we send “M03 S<value>” with <value> from 0 to 255, perform intensity of laser ray.

And you will see the difference about laser intensity
To off the Laser, we send “M05”.
[index] b. 3D printing module testing[/index]
Send “M360 E4” to select 3D Printing mode.
To set hot end temperature, use “M104 S<temp>” with <temp> is target temperature.
And you will see the difference about laser intensity
To off the Laser, we send “M05”.
[index] b. 3D printing module testing[/index]
Send “M360 E4” to select 3D Printing mode.
To set hot end temperature, use “M104 S<temp>” with <temp> is target temperature.
For example, to print at 195°C, we will send “M104 S195”

And now, we want to know the current hot end temperature, send “TempState”
And now, we want to know the current hot end temperature, send “TempState”
To turn off the temperature, send “M104 S0”
And now, the temperature is decreasing.
[index] c. Pump Box and Suction Cup testing[/index]
Send “M360 E0” to select Vacuum mode.
“G01 W<angle>”: rotate to <angle> degree on 4-axis with <angle> from 0 to 180 degree.
“M03”: Turn on the Vacuum
“M05”: Turn off the Vacuum
[index] d. Gripper testing[/index]
Send “M360 E1” to select Gripper mode.
“G01 W<angle>”: rotate to <angle> degree on 4-axis with <angle> from 0 to 180 degree.
“M03 S<angle>”: Gripper close to <angle> degree
“M03 S0” or “M05”: Gripper open
[index] e. Setup wifi connection[/index]
Please still connect your computer with robot via USB cable to setup wifi connection.
Next, we must choose wifi mode:
Set SSID of your wifi for robot: “SSID:<YourWifiName>”
Set password of your wifi for robot: “PSWD:<YourPassword>”
For example:
If your robot responds to its IP address, setup done! Robot was able to automatically connect to your wifi every time you choose the wifi mode.
Note: You should make a note of the robot’s IP address for the wifi connection with Delta X Software.
[/document]